Please leave comments at the end. Enjoy!!
Step 1: Read the Script

The single, most important part to designing lighting is to READ THE SCRIPT. Sit down in a cozy chair, grab yourself a steaming cup of cocoa, and enjoy a nice read. Don't think lighting or stage or anything at this point - just read it. In my opinion, this is the single most important part of the design process. By the time the show opens, you'll have read the script more times than you can count, but you only get one chance to be surprised by it like an audience will be! Once you've enjoyed the script, read it again! And again!
At this point you can start figuring out the most basic requirements of the script - "this is at night under strong moonlight", "this is in a smoky bar at night", or "this is a scorching summer day". You are NOT, I repeat, NOT, allowed to think about lighting instruments or positions or gel colors or dimmers or anything at this point! You are just building a mental image in your head of what this would actually look like - not what it would look like on a stage, but what it would look like if you actually lived it.
Start thinking about what are the most important parts of the show? Where is the climax? What lessons do we learn? What are the most important scenes? Now, what are the most important moments within those scenes? As you do this, you will start progressing into the next step...
Step 2: Lay Out the Cues
This step, and the step following it, will basically happen at the same time throughout the preparation process. You should start thinking about the lighting design early - when the actors start their rehearsals is often a good time. Start reading the script and listening to the music, and figuring out roughly where cues should go. The most important thing is, don't be afraid of too many cues! If there's a significant change in the mood or motive of a character, drop in a cue. If everyone else leaves and the character sings her power ballad, drop in a couple cues. Cues can always be deleted later, but it's much better to have A LOT planned out.
As you add to your cue list, you should also be assembling your images as outlined in the next step. When the cast gets more rehearsed, stop in and watch rehearsals - seeing blocking in a musical number can give you TONS of ideas for where to place cues. Look at the set - seeing the color and texture of it, as well as how it moves on and off, is also the basis for lots of cues. It's easy to delete a cue, but there's few things worse than watching a show and wishing you had just made that TINY LITTLE CHANGE right there. This process will continue from now right up until the show opens. Don't worry about cue numbers at this point, just get the placement and what the cue will do.
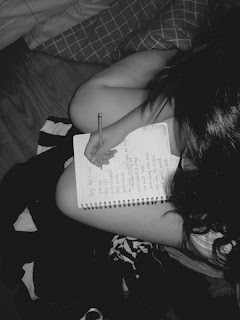
I like to use an excel spreadsheet to make keeping my cues in order easy, and I always carry around a notebook so I can jot down a cue idea at any time, then update it in my spreadsheet when I get a chance. I've included an example from my design of "Into The Woods" below:
Step 3: Find the Image
As I said, this step should happen back and forth with the previous step. Next on your list is to turn your mental image of a scene into a physical one. Head over to Flickr, DeviantArt, iStock, Getty Images, find some renaissance-era paintings, anything like that. Start looking for examples of the kind of lighting you had in mind. Don't try to cheat - if you're lighting the Dream Ballet in Oklahoma, don't type in "Oklahoma Dream Ballet" - instead, search for "nightmare", "dreamy", "floating", any adjective that you think works. Don't limit yourself to one image for each scene - you should strive to find an image for each cue or general lighting idea, and ideally you'd have more than one image. From these images, you can simply pull out what you like from each image and turn that into a lighting design. Below is an example of a show I designed, showing the research image, then what the final cue actually looked like:
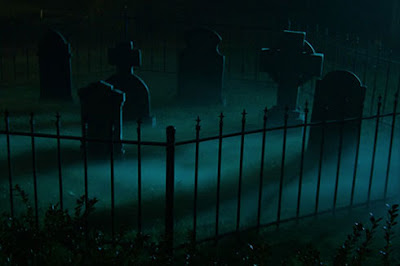
The research image for the Graveyard scene in Scrooge. The light coming in at a very low angle and slightly from the back is the biggest thing I latched on to, but I also wanted to capture the eerie blue-green color of the light.
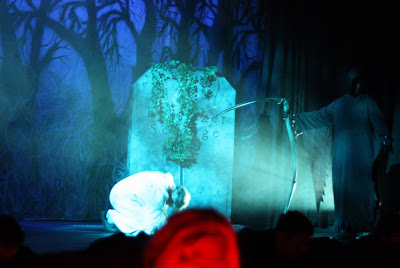
The final look as it appeared on stage. You can see I tried to replicate the low angle light by using a shinbuster (light mounted on the floor, or at "shin-busting" height), and I also used colors similar to those in the image.
Step 2: Lay Out the Cues

This step, and the step following it, will basically happen at the same time throughout the preparation process. You should start thinking about the lighting design early - when the actors start their rehearsals is often a good time. Start reading the script and listening to the music, and figuring out roughly where cues should go. The most important thing is, don't be afraid of too many cues! If there's a significant change in the mood or motive of a character, drop in a cue. If everyone else leaves and the character sings her power ballad, drop in a couple cues. Cues can always be deleted later, but it's much better to have A LOT planned out.
As you add to your cue list, you should also be assembling your images as outlined in the next step. When the cast gets more rehearsed, stop in and watch rehearsals - seeing blocking in a musical number can give you TONS of ideas for where to place cues. Look at the set - seeing the color and texture of it, as well as how it moves on and off, is also the basis for lots of cues. It's easy to delete a cue, but there's few things worse than watching a show and wishing you had just made that TINY LITTLE CHANGE right there. This process will continue from now right up until the show opens. Don't worry about cue numbers at this point, just get the placement and what the cue will do.
I like to use an excel spreadsheet to make keeping my cues in order easy, and I always carry around a notebook so I can jot down a cue idea at any time, then update it in my spreadsheet when I get a chance. I've included an example from my design of "Into The Woods" below:
Step 3: Find the Image

As I said, this step should happen back and forth with the previous step. Next on your list is to turn your mental image of a scene into a physical one. Head over to Flickr, DeviantArt, iStock, Getty Images, find some renaissance-era paintings, anything like that. Start looking for examples of the kind of lighting you had in mind. Don't try to cheat - if you're lighting the Dream Ballet in Oklahoma, don't type in "Oklahoma Dream Ballet" - instead, search for "nightmare", "dreamy", "floating", any adjective that you think works. Don't limit yourself to one image for each scene - you should strive to find an image for each cue or general lighting idea, and ideally you'd have more than one image. From these images, you can simply pull out what you like from each image and turn that into a lighting design. Below is an example of a show I designed, showing the research image, then what the final cue actually looked like:

The research image for the Graveyard scene in Scrooge. The light coming in at a very low angle and slightly from the back is the biggest thing I latched on to, but I also wanted to capture the eerie blue-green color of the light.

The final look as it appeared on stage. You can see I tried to replicate the low angle light by using a shinbuster (light mounted on the floor, or at "shin-busting" height), and I also used colors similar to those in the image.
Darn, I shouldn't have shown you that. Because now you're thinking about lights and positions. STOP! Remember, we're just talking about IDEAS at this stage. It doesn't matter if you don't have enough lights, or if you can't hang a light there, or any of that. Just get an idea of where the light is coming from, and the rest will take care of itself.
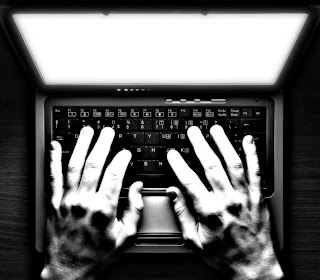
A Note From Me: Now is a great time to talk about an "Image File". I have a folder on my computer that is PACKED with all sorts of photos, paintings, drawings, illustrations, and lots of other kinds of visual mediums. Any time I comeacross something online that I like, I download it and save it in this folder. I would highly advise any aspiring lighting designer to start a file like this. Just make sure that you can articulate WHY you like every image, and that it has some artistic or creative value, and possibly a relation to lighting. When you're having creative block, or you're searching for an idea for a show, a browse through this folder can provide the creative jumpstart needed to get back on track. I have downloaded quite a few images because I liked them, then ended up using them as research images much, much later! The image to the right is an example of one of those images.

Conclusion
These three steps will continue to happen in tandem throughout the entire production process, and will only end when the show opens. On large Broadway shows and giant European operas, designers can spend years just on this phase of design, and your success in this area is the biggest deciding factor of how good your design will eventually be. In Part II, I'll discuss how to turn your images into stage designs.
Questions? Comments? Leave them below! See you in Part II!
Wow! Okay, first of all, that bunny is adorable! Secondly, You should write a book, Seriously! Even though I remembered this process and thought at the beginning, "He is going to show that graveyard scene from Scrooge, isn't he?" I still feel like I learned more! Oh, and this part: "Darn, I shouldn't have shown you that. Because now you're thinking about lights and positions. STOP!" totally was right! That was exactly what I was thinking about! Haha! :) I can't wait for part two and beyond! Thanks!
ReplyDelete