I'm not going to beg you to return my camera, or call you all sorts of names that can't be repeated here. I've already done that. Many times. But before I go, I just want you to know what exactly you've taken from me.
First off, you've taken my camera. And my lenses. And my memory cards. And my filters, my caps, my bags, my tripod, my sight, my flash, my adapters, and everything else in that bag. You already know this. And guess what:$1200 of camera equipment doesn't come cheap - around $1200, in fact.
You've taken my escape. In a lifestyle filled with sleepless nights and 20-hour drafting sessions and endless days of tech, my camera is the one thing that I could always count on when I needed to get away from it all. In fact, it's one of the only things I own that isn't directly related to my work.
You've taken my art. Photography has been my outlet for expressing myself. Whether it's love, longing, sadness, stress, happiness, relief, anger, frustration, or anything else, my camera was my means to take my emotions out from within me and express my inner creative passion.
You've taken my goals. I really want you to think about this part, so I'll say it slowly. By the end of work this summer, I would have saved enough money so that I could spend next summer volunteering in Alaska building homes for those who needed them. It costs a lot of money, and I don't get anything out of it, but it's something that I'm very passionate about wanting to do. Well thanks to you, my summer paychecks will instead go to the fund for my new, replacement camera. Thanks to you, there will be one less volunteer helping families in need next summer. I hope you're happy.
She's a nice camera. Take good care of her. And fuck you.
R
Wednesday, May 4, 2011
Monday, April 25, 2011
Surrounded by Amazing
Sometimes I forget just how lucky I really am.
I thrive on talent. I love nothing more than to surround myself with talented people, doing what they do best, reaping the rewards of their endless practice and devotion to their art. Art, of course, comes in an infinite variety of forms, but as a musician, I have a soft spot in my heart for art through music. It's lucky, then, that I have the good fortune to spend my days surrounded by some of the most talented musical theatre students in the world.
I spend so much of my time with other tech/design students doing our own work that I sometimes forget to acknowledge the incredible things happening in the studio below our Design Room by the actors, the singers, and the dancers who bring theatre to life.
I'm presently working as a Mic Dresser on the final production of Ithaca's mainstage season, a musical called Baby. As part of my job, I've grown quite close to many of the cast members, and I've made at least a few friendships that will last long after this show closes. As I joke around with and spend time with these people, I tend to forget how much raw talent, dedication, and passion is contained within each and every one of them. I often ask myself why I am so fortunate to be able to just be around them, much less to call them my friends.
When they're hanging around backstage, they're no more than normal college students sharing gossip, talking about last night's party, and just having fun. But as soon as they start to do what they do best, I am instantly reminded of just how lucky I am to be in the presence of such talent, and I only hope that I can someday harness the dedication to perfect my craft to the level that they have,
To end this post, I'd like to share a few videos from these amazing individuals who I get to interact with every day. While you probably don't know them personally, I hope they can move you as they've moved me.
Friday, April 1, 2011
One Year Later
What a difference a year makes...
Today, April 1, is an important anniversary for me. And no, it's not because it's also April Fools Day. Exactly one year ago today, I got a phone call that launched me into one of the most difficult, demanding, painful, exhausting, and thrilling summers I've ever had the privilege to experience. I remember it clearly - I signed all the contracts, sealed them in an envelope, and went to the computer to start a blog, this blog in fact, with the promise that I would blog about the fantastic journey I was about to embark upon.
Well, looking back one year later, my summer was more fantastic than I could have ever imagined it. As hard as I've tried, there are some experiences that simply can't be captured in words. The day when we all took a leap of faith and jumped off the waterfall. The night where we sat and stared at the waterfall and the stars above for hours. The karaoke nights at Kilpatricks. The fancy dresses and sport jackets on opening nights. And the countless nights sitting around, talking and laughing and living life. I learned so much about theatre, about life, and about myself every single day. And most importantly, I reaffirmed the choices for my life and reshaped who I am as a human being.
Looking back through my old blog posts from last summer, I wonder what my true motive was to start this blog in the first place. Was it for others to read and follow my activities, or was it for something else? I can't say if this blog is read by anyone at all, but the memories and the moments it holds here are poignant reminders for me of a wonderful time that is now over.
It's been one year to the day since I signed up for the summer of my life, and today marks the day that I'm doing it again. I have officially accepted another internship for summer 2011, this time at a facility on the outskirts of New York City. While I can't actually reveal the name of the company yet, I am thrilled to a level that I have only felt once before - one year ago today. I will be spending three months living and working in New York City, rubbing shoulders with the individuals who have shaped and defined the theatre into what it is today. There's no way of knowing what may lie in store for tomorrow, but I am eager to turn the page and dive in headfirst.
Tuesday, January 11, 2011
Lighting Design 101: Part II
Welcome back! If you haven't yet read the first installment of "Lighting Design 101," you can read it here. If you've already read Part I and are ready for more, then congratulations! Thanks for sticking with me. As a quick recap, remember that, together with the director, we went through the script and found the most important parts we wanted to reinforce. We also started making our cue list and finding research images to go along with it.


In this part, we're going to take our research images and our ideas and start putting them into real stage designs. Also remember that we are NOT yet talking about lights or instruments or positions or gels or dimmers or cables or any of that stuff! Right now, you're just a painter who happens to be painting with light, carefully planning out each stroke of your brush.
Please leave any comments or questions at the end. Enjoy!!
Step 4: Pull Out the Lighting
So now you're finally ready to start putting your designs down onto paper. Remember - you're still not allowed to think about positions, instruments, gel colors, gobos, or any of that! There are many different ways of approaching this next step, but I prefer to use a lighting key. A lighting key is a simple diagram that shows the general angles, colors, and textures of lights in a scene. Rather than showing a full stage's worth of lighting, however, the lighting key shows just one point on a stage, whether this is for a full stage wash or for a tiny scene played far downstage left.
A lighting key, like much of what we do during the pre-production stages, is always changing and evolving. For every show, I dedicate an entire notebook of lined paper to lighting keys. After the template, everything is written only in pencil, to allow easy erasing and updating (for this example, I have used pen to aid in readability). Below is the basic starting point for a lighting key:
A blank lighting key. The plus sign represents the center point of the key, which can be any given point on a stage. The description should be a detailed description of how you want the lighting to affect the scene and what you want to do with the cue.
Using a pencil, you can now begin to lay out the general strokes of light that you want in this scene. For these examples, I will be using the lighting keys from my design of ELT's Into The Woods in 2009. For the following descriptions, refer to the photo below:
Each arrow on the key represents one direction, color, and angle of light. The long arrow on the bottom left of the image with the label "White" is the key light. The key light is the strongest motivated light in a scene. In an outdoor scene, the key light is often the sun or possibly the moon. Indoors, the key light could be a fireplace or a table lamp. When trying to determine the key light, just ask yourself, "what would be providing the illumination if I were actually living in this scene?". Properly identifying and using your key light is crucial to the quality and believability of your lighting design.
For this cue, the motivation for the key light came from the sun streaming through the trees (like in a forest), so I indicated that I wanted the key light to be white with a texture to it. I wrote the general color idea by the arrow, and I also put the letter T in a circle to indicate a texture. Finally, I chose to write the word Key in a box to remind myself that this was the key light in the scene.
Next, you need to identify the fill light. The fill light is any light other than the key light, which may be coming from the same or different sources of light. When the key light is a single source like the sun, the fill light will probably include reflections from walls, the floor, and anything else. Stand outside on a sunny evening before the sun sets and notice the strong key light created by the sun. Also notice that the part of your body in shadow is also lit. This comes from the reflections off any surrounding objects, and even off the air itself. When it gets darker, it may also come from street lights, car headlights, traffic signals, lamp light, campfires, or any thousands of sources. Unlike key light, you can have many, many different sources of fill light - if a fireplace is the key light, the fill light could be coming from reflections from the fire from multiple angles, moonlight through a window, light from the overhead ceiling lamp, light from the table lamp, light coming in through the door to the kitchen, and many other sources.
A good way to start your lighting keys is to literally copy the lighting scheme from your research images into your lighting key, then modify that as necessary. This is also a great exercise for any lighting designer to start becoming aware of light in the world around you. Try creating a detailed lighting key from a renaissance-era painting from one of the masters - you will learn a lot from this experience, and you may quickly discover that some of the lighting used in these paintings can't even be replicated in the real world!For this cue, the primary fill light was indirect sunlight that was reflecting from other objects in the woods. I used two main directions, one in the same direction as the key light, and one in almost the opposite direction. I also chose to make these a slightly darker color (light amber) to allow the key light to remain primary. I also used an even deeper amber from the top to further surround the actor in fill light, and the white texture from the top added even more to the feel of being in the woods.
You should constantly be making new lighting keys and modifying your old ones. This process should continue until a few weeks before tech week, when it's time to start thinking about ordering.
Step 5: Making Decisions
Now it's a few weeks before the show, and it's finally time to start making some solid design decisions. Pull out your swatch books, your gobo catalogs, and your instrument spec sheets, and let's get to work! By this time you should have been modifying and updating your lighting keys for a while, and you should have a fairly solid idea of the lighting requirements
for each cue. How to choose color is one of the most involved and personal parts of lighting design, and entire articles can be written about this alone (perhaps in the future...). However, for now, just know that as you start to decide on solid gel choices, you simply replace your general colorideas with the actual gel choices on your lighting key. The same process goes for choosing templates. For the key light, I wanted the look of light streaming through a forest, so I eventually decided on R77805: Leaf Breakup Medium (see image at right).You should continue to decide on specific gels and gobos until your entire lighting key is specified. Don't worry if you're still trying to finalize some of your choices - there's still time to finish final details. Also, keep in mind that changing gel midway through tech week is easy and quite common, as long as you have the new gel in stock. If you're really having trouble deciding between two colors, consider ordering enough of both color so you can try both and see which works best. See the updated lighting key below for an example of a completed key:
Step 6: Choose the Instruments
As a Lighting Designer, you should be very familiar with the different qualities of light that you can get from different types of instruments: Ellipsoidals (ERS), Fresnels, PAR Cans, Striplights, Follow Spots, Scoops, and whatever other instruments you have access to. It is at this point that you can start deciding what quality of light you want for each stroke of light. Without a doubt, the instrument that offers the most control is an Ellipsoidal, because of it's ability to create a hard or a soft edge, use a gobo, and use shutters in the beam. However, in many instances, the broad soft light of a fresnel or the bright punchy effects of a PAR can be more desirable. You should not be specifying specific degrees or angles of units, such as a 19 degree ERS or a Wide Flood PAR Can. Instead, you should just be choosing the ideal type of instrument that you would choose for that light source.
Conclusion
And that concludes Part II! You should now have a fairly complete list of tentative cues, a large number of research images for your show, and a sizable collection of lighting keys for each major look. You should also have a pretty solid idea of what colors and gobos you want to use in your show. These decisions are still fluid and can be changed right up until hang day.
See you in Part III!!
A Quick Interjection
Tonight, having nothing better to do in my hotel room, I turned on Comedy Central to watch The Daily Show with Jon Stewart. Instead of the funny, comedic show that I was expecting, I was treated to a powerful, touching, and heartfelt monologue about the horrible tragedy in Tuscon this past weekend. If you haven't seen it yet, I urge you to find a clip online and watch it.
In the spirit of touching monologues, I looked up the speech that Jon Stewart gave following the horrific attacks of September 11, 2001. In light of the recent tragedy in this country, it feels like an appropriate time to reflect back on the past.
Monday, January 10, 2011
Lighting Design 101
Okay! So I've decided to start a multi-part series on how to design lighting in an amateur environment. I know pretty much every LD has their own article with this title, but I wanted to do something a little different. Every article you read on this subject will go deep into analyzing and evoking and lots of that stuff. While I will also go there, I'm gonna approach it from the standpoint of a designer+technician, as is found in most high school and community theatre productions. I'm gonna skip over a lot of very important parts, and probably focus on stuff that doesn't matter much. But I hope it fills a gap that I feel is left by the other articles.
Please leave comments at the end. Enjoy!!
Step 1: Read the Script

The single, most important part to designing lighting is to READ THE SCRIPT. Sit down in a cozy chair, grab yourself a steaming cup of cocoa, and enjoy a nice read. Don't think lighting or stage or anything at this point - just read it. In my opinion, this is the single most important part of the design process. By the time the show opens, you'll have read the script more times than you can count, but you only get one chance to be surprised by it like an audience will be! Once you've enjoyed the script, read it again! And again!
Darn, I shouldn't have shown you that. Because now you're thinking about lights and positions. STOP! Remember, we're just talking about IDEAS at this stage. It doesn't matter if you don't have enough lights, or if you can't hang a light there, or any of that. Just get an idea of where the light is coming from, and the rest will take care of itself.
Please leave comments at the end. Enjoy!!
Step 1: Read the Script

The single, most important part to designing lighting is to READ THE SCRIPT. Sit down in a cozy chair, grab yourself a steaming cup of cocoa, and enjoy a nice read. Don't think lighting or stage or anything at this point - just read it. In my opinion, this is the single most important part of the design process. By the time the show opens, you'll have read the script more times than you can count, but you only get one chance to be surprised by it like an audience will be! Once you've enjoyed the script, read it again! And again!
At this point you can start figuring out the most basic requirements of the script - "this is at night under strong moonlight", "this is in a smoky bar at night", or "this is a scorching summer day". You are NOT, I repeat, NOT, allowed to think about lighting instruments or positions or gel colors or dimmers or anything at this point! You are just building a mental image in your head of what this would actually look like - not what it would look like on a stage, but what it would look like if you actually lived it.
Start thinking about what are the most important parts of the show? Where is the climax? What lessons do we learn? What are the most important scenes? Now, what are the most important moments within those scenes? As you do this, you will start progressing into the next step...
Step 2: Lay Out the Cues
This step, and the step following it, will basically happen at the same time throughout the preparation process. You should start thinking about the lighting design early - when the actors start their rehearsals is often a good time. Start reading the script and listening to the music, and figuring out roughly where cues should go. The most important thing is, don't be afraid of too many cues! If there's a significant change in the mood or motive of a character, drop in a cue. If everyone else leaves and the character sings her power ballad, drop in a couple cues. Cues can always be deleted later, but it's much better to have A LOT planned out.
As you add to your cue list, you should also be assembling your images as outlined in the next step. When the cast gets more rehearsed, stop in and watch rehearsals - seeing blocking in a musical number can give you TONS of ideas for where to place cues. Look at the set - seeing the color and texture of it, as well as how it moves on and off, is also the basis for lots of cues. It's easy to delete a cue, but there's few things worse than watching a show and wishing you had just made that TINY LITTLE CHANGE right there. This process will continue from now right up until the show opens. Don't worry about cue numbers at this point, just get the placement and what the cue will do.
I like to use an excel spreadsheet to make keeping my cues in order easy, and I always carry around a notebook so I can jot down a cue idea at any time, then update it in my spreadsheet when I get a chance. I've included an example from my design of "Into The Woods" below:
Step 3: Find the Image
As I said, this step should happen back and forth with the previous step. Next on your list is to turn your mental image of a scene into a physical one. Head over to Flickr, DeviantArt, iStock, Getty Images, find some renaissance-era paintings, anything like that. Start looking for examples of the kind of lighting you had in mind. Don't try to cheat - if you're lighting the Dream Ballet in Oklahoma, don't type in "Oklahoma Dream Ballet" - instead, search for "nightmare", "dreamy", "floating", any adjective that you think works. Don't limit yourself to one image for each scene - you should strive to find an image for each cue or general lighting idea, and ideally you'd have more than one image. From these images, you can simply pull out what you like from each image and turn that into a lighting design. Below is an example of a show I designed, showing the research image, then what the final cue actually looked like:
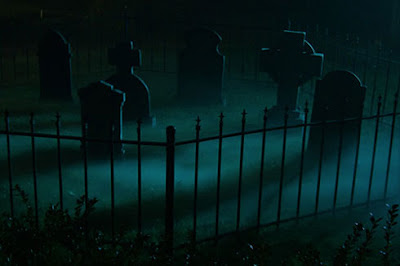
The research image for the Graveyard scene in Scrooge. The light coming in at a very low angle and slightly from the back is the biggest thing I latched on to, but I also wanted to capture the eerie blue-green color of the light.
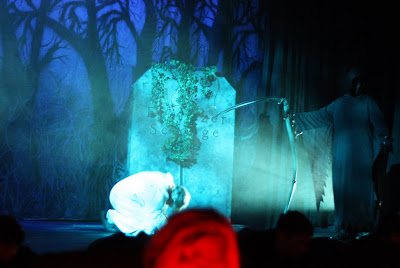
The final look as it appeared on stage. You can see I tried to replicate the low angle light by using a shinbuster (light mounted on the floor, or at "shin-busting" height), and I also used colors similar to those in the image.
Step 2: Lay Out the Cues

This step, and the step following it, will basically happen at the same time throughout the preparation process. You should start thinking about the lighting design early - when the actors start their rehearsals is often a good time. Start reading the script and listening to the music, and figuring out roughly where cues should go. The most important thing is, don't be afraid of too many cues! If there's a significant change in the mood or motive of a character, drop in a cue. If everyone else leaves and the character sings her power ballad, drop in a couple cues. Cues can always be deleted later, but it's much better to have A LOT planned out.
As you add to your cue list, you should also be assembling your images as outlined in the next step. When the cast gets more rehearsed, stop in and watch rehearsals - seeing blocking in a musical number can give you TONS of ideas for where to place cues. Look at the set - seeing the color and texture of it, as well as how it moves on and off, is also the basis for lots of cues. It's easy to delete a cue, but there's few things worse than watching a show and wishing you had just made that TINY LITTLE CHANGE right there. This process will continue from now right up until the show opens. Don't worry about cue numbers at this point, just get the placement and what the cue will do.
I like to use an excel spreadsheet to make keeping my cues in order easy, and I always carry around a notebook so I can jot down a cue idea at any time, then update it in my spreadsheet when I get a chance. I've included an example from my design of "Into The Woods" below:
Step 3: Find the Image

As I said, this step should happen back and forth with the previous step. Next on your list is to turn your mental image of a scene into a physical one. Head over to Flickr, DeviantArt, iStock, Getty Images, find some renaissance-era paintings, anything like that. Start looking for examples of the kind of lighting you had in mind. Don't try to cheat - if you're lighting the Dream Ballet in Oklahoma, don't type in "Oklahoma Dream Ballet" - instead, search for "nightmare", "dreamy", "floating", any adjective that you think works. Don't limit yourself to one image for each scene - you should strive to find an image for each cue or general lighting idea, and ideally you'd have more than one image. From these images, you can simply pull out what you like from each image and turn that into a lighting design. Below is an example of a show I designed, showing the research image, then what the final cue actually looked like:

The research image for the Graveyard scene in Scrooge. The light coming in at a very low angle and slightly from the back is the biggest thing I latched on to, but I also wanted to capture the eerie blue-green color of the light.

The final look as it appeared on stage. You can see I tried to replicate the low angle light by using a shinbuster (light mounted on the floor, or at "shin-busting" height), and I also used colors similar to those in the image.
Darn, I shouldn't have shown you that. Because now you're thinking about lights and positions. STOP! Remember, we're just talking about IDEAS at this stage. It doesn't matter if you don't have enough lights, or if you can't hang a light there, or any of that. Just get an idea of where the light is coming from, and the rest will take care of itself.
A Note From Me: Now is a great time to talk about an "Image File". I have a folder on my computer that is PACKED with all sorts of photos, paintings, drawings, illustrations, and lots of other kinds of visual mediums. Any time I comeacross something online that I like, I download it and save it in this folder. I would highly advise any aspiring lighting designer to start a file like this. Just make sure that you can articulate WHY you like every image, and that it has some artistic or creative value, and possibly a relation to lighting. When you're having creative block, or you're searching for an idea for a show, a browse through this folder can provide the creative jumpstart needed to get back on track. I have downloaded quite a few images because I liked them, then ended up using them as research images much, much later! The image to the right is an example of one of those images.

Conclusion
These three steps will continue to happen in tandem throughout the entire production process, and will only end when the show opens. On large Broadway shows and giant European operas, designers can spend years just on this phase of design, and your success in this area is the biggest deciding factor of how good your design will eventually be. In Part II, I'll discuss how to turn your images into stage designs.
Questions? Comments? Leave them below! See you in Part II!
Tuesday, January 4, 2011
Well...
Well…
I just walked out of the Stage Door of a Broadway theatre and was instantly greeted with screams of excitement, deafening cheers, and incessant requests for an autograph from an enormous crowd of In The Heights fans. They weren’t for me of course, and I just chuckled and walked away, but I gotta admit:
It was pretty darn cool :)
Subscribe to:
Posts (Atom)